Ultra Pucker-y Lemon Bars

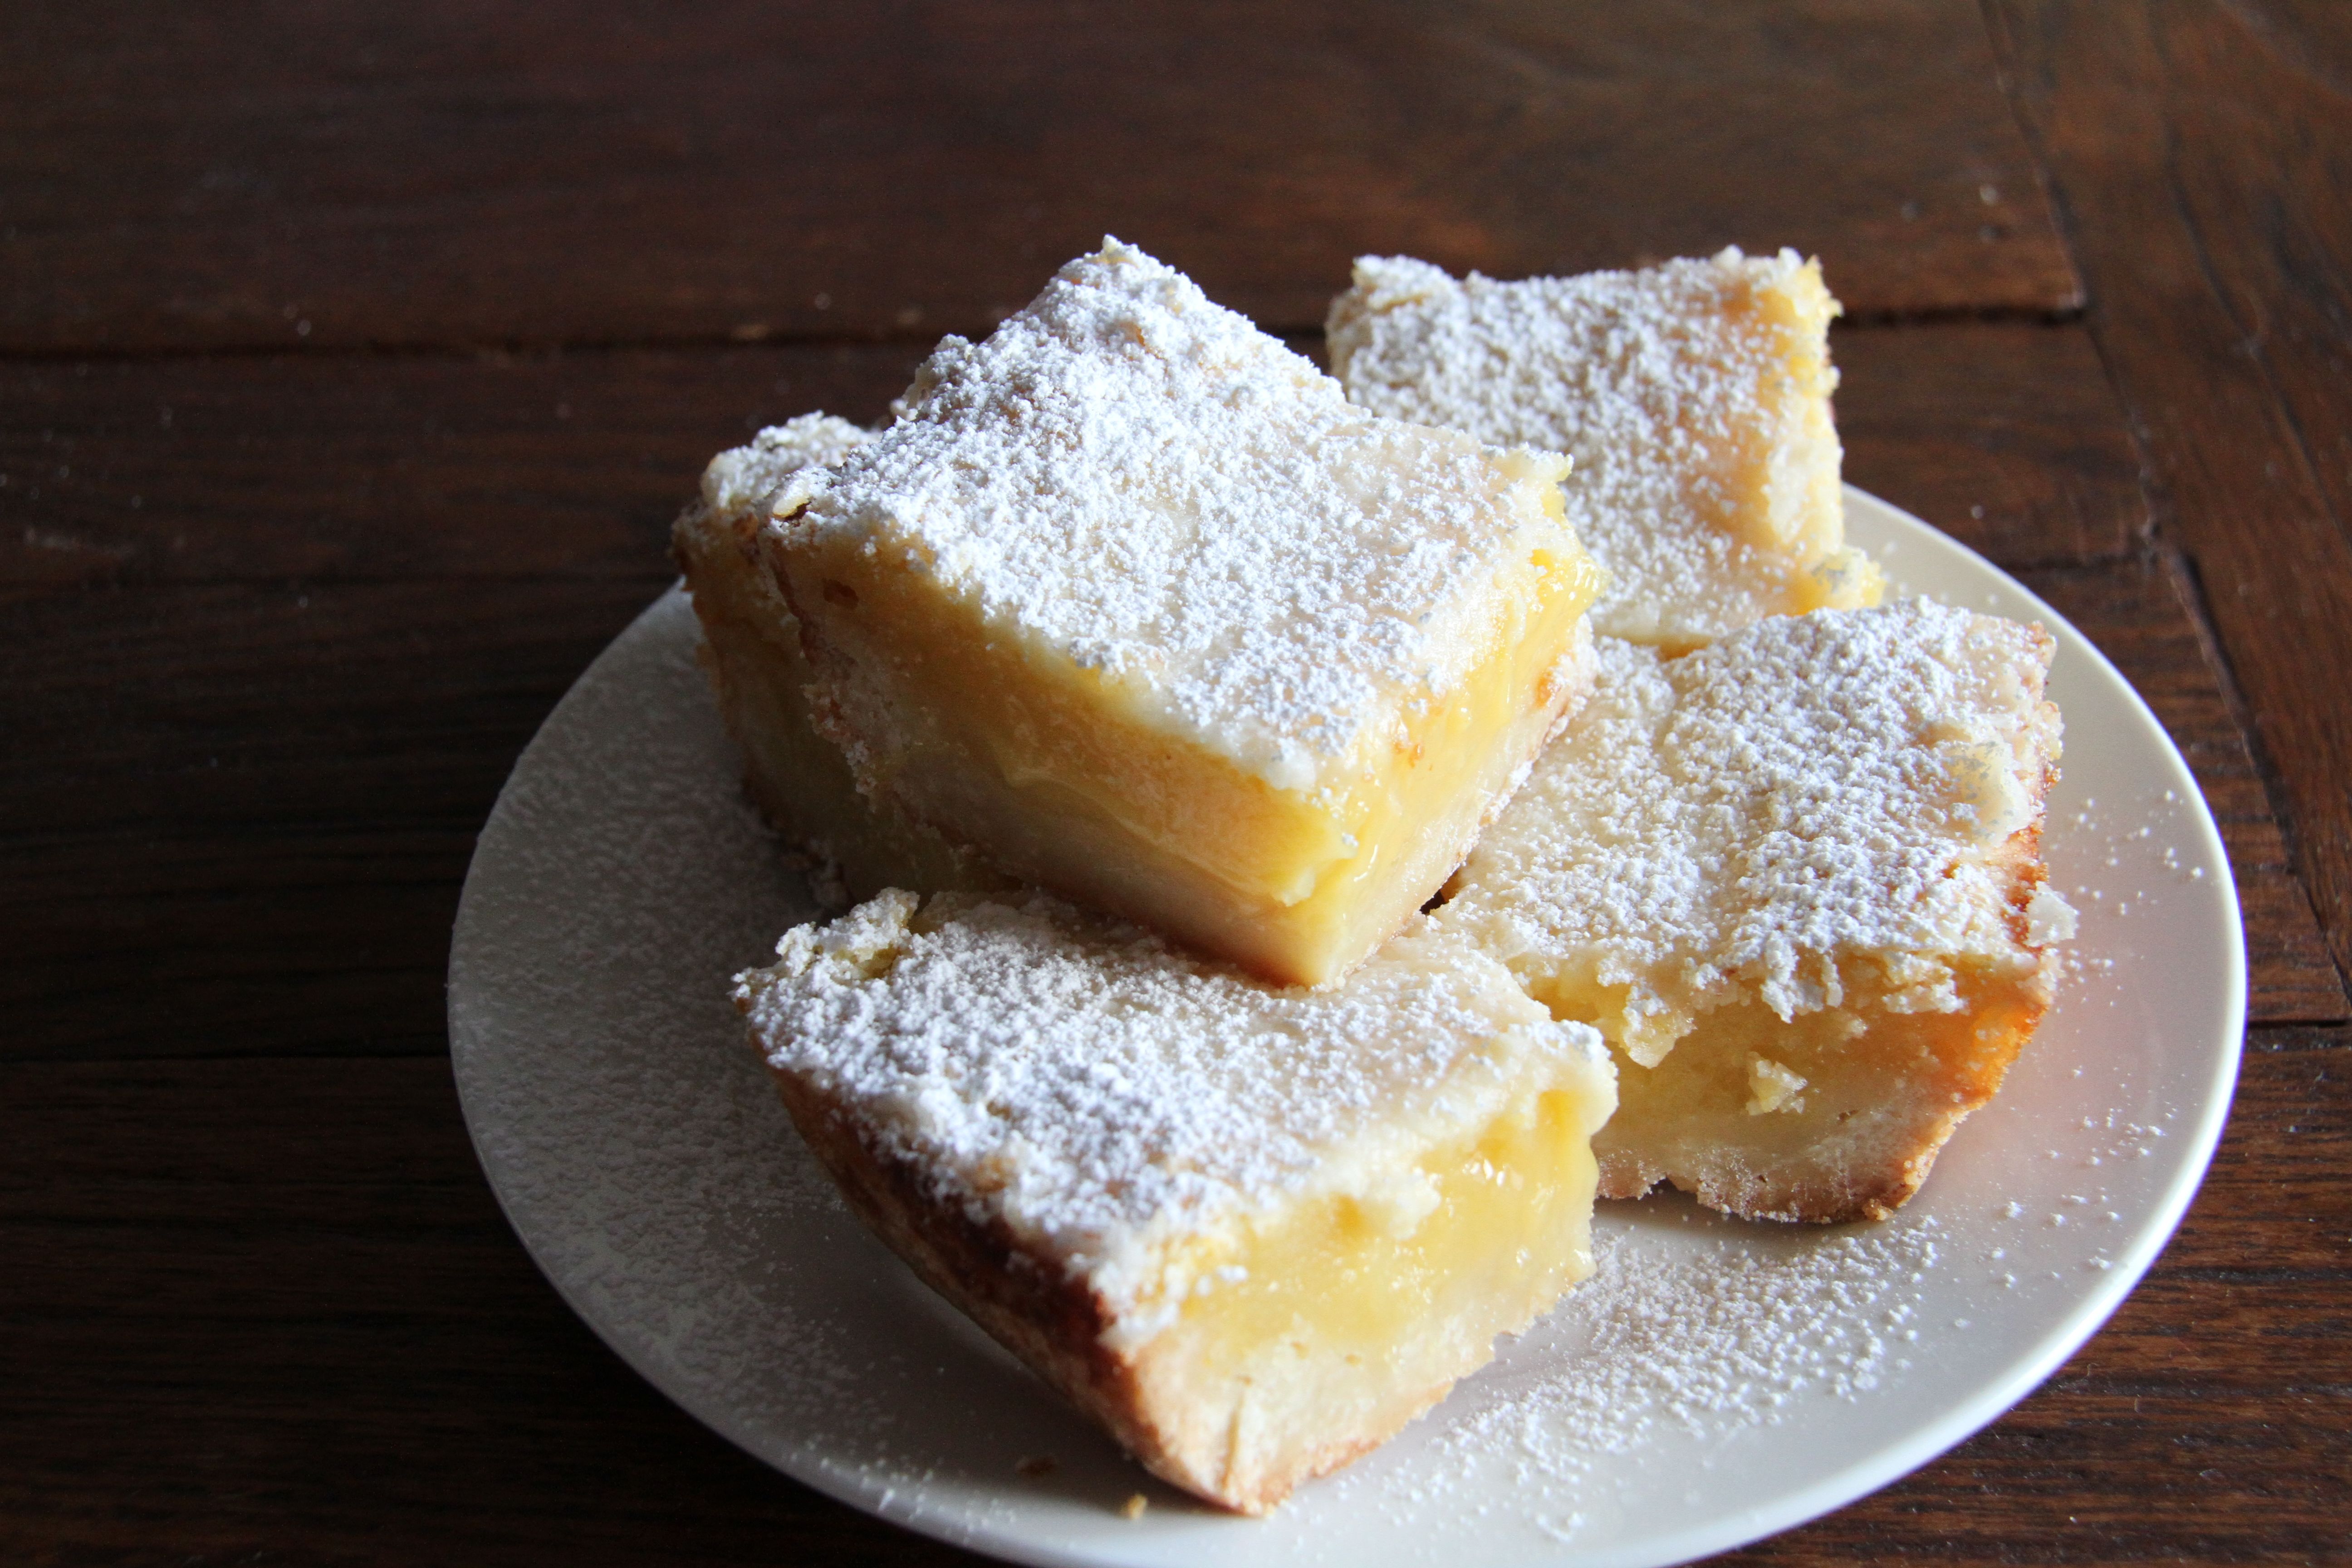
Not too long ago I did a post about these Gooey Lemon Blondies that had become my go-to lemon fix.  While I still adore them, I had a friend request something with even more of a lemon punch.  So the search began, along with the baking and tasting (such a tough job).  While most recipes I found called for 1/2 cup – 2/3 cup lemon juice, this one calls for an entire cup – perfection!  I tweaked the recipe ever so slightly by using 1/2 cup less sugar in the lemon layer and adding a lemon glaze on top.  It doesn’t get much more lemony than this folks, prepare to pucker up!


Recipe (adapted very slightly) from Smitten Kitchen:

crust:
8 oz unsalted butter, room temperature
1/2 cup granulated sugar
2 cups flour
1/8 teaspoon kosher salt

lemon layer:
6 extra-large eggs, room temperature
2 1/2 cups granulated sugar (I used 2 cups)
2 tablespoons grated lemon zest (4 to 6 lemons)
1 cup freshly squeezed lemon juice
1 cup flour

glaze:
juice of 2 medium lemons 
3/4-1 cup powdered sugar, or enough to make a thin consistency


Confectioners’ sugar, for dusting

Preheat the oven to 350°F and grease a 9 by 13 by 2-inch baking sheet.  (I had a casserole dish which worked as well, I just increased the baking time a bit as my dish was slightly smaller than 9 x 13)

For the crust, cream the butter and sugar until light in the bowl of an electric mixer fitted with the paddle attachment. Combine the flour and salt and, with the mixer on low, add to the butter until just mixed. Dump the dough onto a well-floured board and gather into a ball. Flatten the dough with floured hands and press it into the greased baking sheet, building up a 1/2-inch edge on all sides. Chill.

Bake the crust for 15 to 20 minutes, until very lightly browned. Let cool on a wire rack. Leave the oven on.

For the lemon layer, whisk together the eggs, sugar, lemon zest, lemon juice, and flour. Pour over the crust and bake for 30 to 35 minutes (less if you are using the thinner topping), or about five minutes beyond the point where the filling is set. Let cool to room temperature.

At this point, I added the glaze and chilled until set.


IMG_1373

IMG_1379

IMG_1376

Advertisement

Naked Carrot Chocolate Chip Cupcakes with Cream Cheese Frosting

If you read food blogs at all I’m sure you’ve come across Sally’s Baking Addiction.  I’ve tried tons of her recipes and the girl is genius – this is no exception.  My husband has been asking me to make a carrot cake for ages, but he’s not a fan of the traditional add-ins so I wanted to find a recipe that was good enough to be made naked (with no add-ins that is – but hey, if baking au naturale is your thing I won’t judge!).  Feel free to make this the traditional way, go half and half, whatever floats your boat – but trust me when I say that the cake can easily stand alone.  It’s spicy, thanks to the ginger,  flavorful and moist.  Now I have a confession to make…I accidentally baked them based on the requirements for the cake version (30 minutes!), DOUBLE the 15-18 minutes they actually need.  Why I thought cupcakes would need to bake that long I’ll never know, but I’m just chalking it up to being blonde.  That being said, they were still super moist and completely delicious.  So good in fact, that by the time I remembered to take pictures, there were only 6 left!  That should tell you #1 it’s an incredibly foolproof recipe and #2 they have to be infallibly moist to withstand that much over baking and still maintain a tender crumb.  I should also explain I had no pastry bags left at this point, so I slapped on the rest of the frosting with a butter knife.  I’m calling it the abstract look.  Yeah, that’s what it is…abstract.


instructions (copied from Sally’s Baking Addiction “My Favorite Carrot Cake Recipe“):

ingredients

cake:
3 cups (390g) Diamond of California chopped pecans or pecan pieces – (I omitted them, but added 1/2 cup chocolate chips)
1 and 1/2 cups (300g) packed light or dark brown sugar (I prefer dark) (I had light on hand)
1/2 cup (100g) granulated sugar
1 cup (240ml) vegetable or canola oil – (I used melted coconut oil)
4 large eggs
3/4 cup (133g) smooth unsweetened applesauce
1 teaspoon vanilla extract
2 and 1/2 cups (312g) all-purpose flour
2 teaspoons baking powder
1 teaspoon baking soda
1/2 teaspoon salt
1 and 1/2 teaspoons ground cinnamon
1 teaspoon ground ginger
1/4 teaspoon ground nutmeg
1/4 teaspoon ground cloves
2 cups (260g) grated carrots (about 4 large)
cream cheese frosting:
16 ounces (450g) full-fat cream cheese, softened to room temperature
1/2 cup (115g) unsalted butter, softened to room temperature
4 cups (480g) confectioners’ sugar
2-3 Tablespoons (30-45ml) heavy cream
1 teaspoon vanilla extract
pinch salt

Directions:

Preheat oven to 300°F (149°C) degrees. Line a large baking sheet with parchment paper or a silicone baking mat. Spread the chopped pecans on the sheet and toast for 8 minutes. Remove from the oven and allow to cool.
Turn the oven up to 350°F (177°C). Spray two 9-inch cake pans* with nonstick spray. Set aside.
In a large bowl, whisk the brown sugar, granulated sugar, oil, eggs, applesauce, and vanilla together until combined and no brown sugar lumps remain. Set aside. In another large bowl, whisk the flour, baking powder, baking soda, salt, cinnamon, ginger, nutmeg, and cloves together until combined. Pour the wet ingredients into the dry ingredients and, using a rubber spatula or wooden spoon, fold the ingredients together until just combined. Then, fold in the carrots and 1 cup of the toasted pecans. The rest of the pecans are used in step 6.
Pour/spoon the batter evenly into the two cake pans. Bake for 30-35 minutes or until a toothpick inserted into the centers comes out clean. Allow the cakes to cool completely in the pans set on a wire rack.
Make the frosting: In a large bowl using a handheld or stand mixer fitted with a whisk or paddle attachment, beat the cream cheese and butter together on medium speed until smooth, about 2 minutes. Add the confectioners’ sugar and 2 Tablespoons of cream. Beat for 2 minutes. Add the vanilla and 1 more Tablespoon cream if needed to thin out. Beat on high for 2 full minutes. Taste the frosting and add a pinch of salt if it is too sweet.
Assemble and frost: First, using a large serrated knife, layer off the tops of the cakes to create a flat surface. Place 1 cake layer on your cake stand or serving plate. Evenly cover the top with frosting. Top with 2nd layer and spread remaining frosting all over the top and sides. Decorate the sides of the cake with the remaining toasted pecans. Slice and serve.
Cover extras up tightly and store at room temperature or in the refrigerator for up to 4 days. Unfrosted cake remains fresh covered tightly at room temperature for 3-4 days. Store frosted cake in the refrigerator for up to 7 days and allow to come to room temperature before serving.

IMG_1369

IMG_1367

IMG_1355


Vanilla Cupcakes with Lightened Up Lime Cream Cheese Frosting

With a wedding to go to in 2 months and still 10 lbs to lose to get back to my pre-stress-induced weight, baking cupcakes should be my last priority.  I should be munching on carrot sticks and hitting the gym like a madwoman, but what do I do instead?  I bake.  And bake some more.  And more.  I mean yes I could give it away to the neighbors, but….I want it all.  Can you tell I’m still struggling with that whole balance thing?  Oh well, I still have time to fit into my dress, right?
Here’s a SUPER easy vanilla cupcake recipe, great for last minute occasions when you need something fast.  I like to add some vanilla bean seeds as well, but if you don’t have them on hand don’t worry, it’s still delicious!  This recipe is from Georgetown Cupcakes.


Yields 20-24 cupcakes.

ingredients:

cupcakes:
2 1/2 cups flour
1/2 teaspoon baking powder
1/4 teaspoon salt
4 ounces unsalted butter
1 3/4 cups sugar
2 large eggs – room temperature
2 1/4 teaspoon pure vanilla extract (optional: seeds of 1 vanilla bean)
1 1/4 cups whole milk – room temperature

frosting:
2 sticks unsalted butter – room temperature 
1/2 package or 4 oz neufchâtel (lightened up version) or cream cheese – room temperature (i used neufchâtel because i had it on hand, but i usually use cream cheese.  either work well)
4 cups powdered sugar, sifted
juice of 1 lime
pinch of salt

Directions:  

cupcakes:
1. preheat oven to 350°F

2.  line two standard cupcake pans 
3.  mix or sift together the flour, baking powder and salt in a medium bowl and set aside
4.  cream the butter and sugar together in a stand mixer
5.  add the eggs one at a time
6.  combine the milk with the vanilla (and vanilla bean seeds if using them)
7.  alternate adding the flour mixture with the milk mixture, starting and ending with the flour.  i did four additions of the flour and three of the milk
8.  pour into prepared cupcake pans.  a 1/4 cup scoop works really well  
9.  bake for 12-15 minutes or until a toothpick inserted in the center comes out clean.  let cool on a wire rack or pop in the fridge to speed up the process

frosting:
1.  cream together the butter and cream cheese

2.  add the powdered sugar – do not overbeat
3.  add the salt
4.  on medium-low speed add in the lime juice
5.  frost cupcakes!

IMG_1282

IMG_1285

IMG_1286

Hair Color Questions Answered!

I get asked a TON of questions about my hair so I thought it was finally time to do a post on it.  First, find a good stylist, find a good stylist, FIND A GOOD STYLIST!  Seems obvious, but with this kind of color you have to be extremely careful, it’s a fine line between ending up yellow and ending up damaged.  I went to so many salons where it was all talk and no skill.   Take your time to find someone brutally honest and really experienced.  Don’t expect to walk out with your perfect color after one appointment either, it took a few processes to get my hair this way.

FAQ’s

Q:  Is your hair blonde or gray?IMG_2688new
A:  I get this question daily.  Depending on the lighting it can go either way.  Everybody sees it a little differently.  

Q:  What’s your natural hair color?
A:  Dirty blonde.  It was platinum as a child and then hormones made it a lovely dark shade (insert sarcasm).

Q:  How often do you color your hair?
A:  On average every 8 weeks.

Q:  How do you make the color last that long?
A:  I only wash it twice a week using Pravana Pure Light Sulfate-Free Brightening Shampoo & Conditioner.  I let the shampoo and conditioner sit for a couple minutes before rinsing to really knock out the brassiness and deposit that touch of violet.  Most importantly, I do a once-a-week Olaplex treatment to strengthen and repair.

Q:  How do you style your hair?
A:  I start with Redken Extreme Anti Snap, followed by Got2B Iconic + Power Mousse & finish off with Pureology 21 Colour Fanatic.  I rough dry it 90%, smooth out the top with a boar bristle round brush, then section off, clip in my extensions and curl with the 1″ Enzo Milano Clipless Curling Wand.  If I’m getting a little greasy in-between washes I use either Oribe Dry Texturizing Spray or just regular ol’ baby powder.

It’s obviously not wash and go, but it could be a LOT worse.  And color maintenance aside, my hair is just difficult in general.  I have about three different textures going on and lots of crazy, curly, kinks right around my face.  You know those girls that can wake up and throw their hair in a bun?  Yeah, not me.  We’re talking blowouts, flatirons…the whole shebang.  For a BUN.  Compared to that, maintaining the color is a cake walk!

Gooey Lemon Blondies

10341613_247586938779207_7623398244634066207_nOver the past few months I discovered a newfound passion…….baking.  This came as a complete shock because typically I avoided  kitchens like the plague.  Recipes always called for things I didn’t have or know how to use, like “food processors…..and big spoons” (as quoted from my favorite TV show, King of Queens), but now, well just call me Betty (you know, as in Crocker).  Some of my all-time favorite recipes are from The Baker Chick like these Gooey Lemon Blondies.  I’d been on the hunt for the perfect lemon bar after my favorite bakery ones were discontinued.  Thank goodness they were or I might never have made these!  Crazy simple to make and WAY more delicious than they look!